
10 Aug Hardtail Mountain Bike Skills You Should Know
We’ve all got to start somewhere and many of us start with a trusty hardtail. They’re the cheapest and easiest way of getting into the sports, but you’ve bought your hardtail out and you’re looking to progress your score. But what do you need to do?
Today I’ve got some top skills that you can learn on your hardtail bike to progress your ride.
The Wheelie
This skill is an absolute jam and it’s not just great for when you’re starting out on your hardtail adventures.
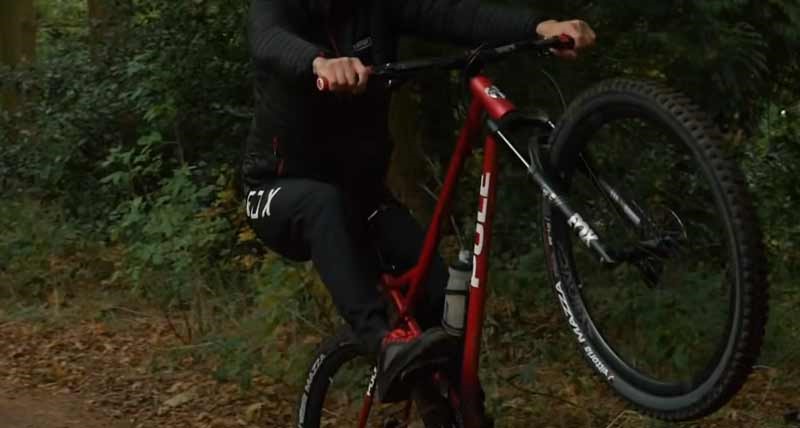
It’s really useful actually just to have any time and that is the wheelie. It’s great for picking your front wheel up over obstacles. It’s a skill that can transfer into other areas as well.
All in all, you need to know hardtail vs full suspension for better wheelie performance.
Moving your body around. But how do we actually do it? Let’s take a little look. The key to lifting in the front is timing your pedal stroke, pulling on the bars as you crouch over the front, and pop-up with your body and pulling up with your arms.
You’re going to want to stamp down on the pedals, firstly, with your lead foot, but then following through the pedal stroke to keep the power down, this is going to help the front end to lift up.
Once the front wheels up, carry on that pedal stroke, keeping them nice and smooth. Shifting your body weight backward and your arms extended, but not locked out.
Cover the rear brake and feather it. If needs be, this is going to stop you from looping out. A couple of top tips for pulling a little wheelie and learning them.
If you are going to do them, come somewhere where it’s a bit soft and safe to do so it’s not busier.
There’s no one around also the grounds. Nice and soft. If somewhere like this or out on a grassy field is much like the wheelie.
Then the next one is the manual equally useful. If not sometimes even. It’s almost the same as a wheelie, but actually without the peddling part, but how do we do them and where would you implement them?
Where you certainly implement them is actually out on the trail, picking the front wheel up and over lots of little obstacles.
Sometimes where you can’t get a pedal choking and let’s look at how we do them as you’re going along. Keep the pedals level squat down into the bike and then pop up shifting your weight.
Behind the rear wheel extending your arms and legs and pulling up the front wheel at the same time. As you do this, make sure you keep your weight to the rear to help with lifting that front wheel and keeping it up.
The more you practice this, the more you’ll get used to finding the balance point top tip always cover the rear brake to stop me from looping out.
Pumping
Trails they’ve got lots of different obstacles in them from fast open Rocky sections to tight twisty sections to corners to jumps.
Now you’re just starting and you’re read this article may you have some beginner tips. So, jumps might not be number one on your priority. So, what can you do over a jump like this one in front of me?
You can pump your way over it, but what is pumping well, it’s essentially using your arms legs on the bicycle to absorb obstacles in the track and trail ahead of you and use those to generate speed much like this jump here in front of me, instead of yeah. Launching off of it.
We’re going to absorb that jump, push on it, generate speed coming out of it because well, maybe we just don’t quite have the skill to go send it into oblivion to start with.
Let’s talk about this jump and we’ve got specifically in front of me though, but bear in mind, pumping can be used in anything from rough ground to turns to help generate that speed.
It’s the same process, but we’re going to be specific at this one on the run-up for something like this a controlled speed pedals level, I’m going to be standing up.
And as I get to the base of this jump, sort of around here and just at the bottom of it that’s what I’m going to start to observe the takeoff with my arms and legs, bringing the bike into the body.
Now, when I get to the top, just as I sort of go over the. That’s where I’m going to start to come up with my body.
So, I’m almost standing back up on the bike again, and then as I come back down the other side, I’m going to crouch into the bike and on the bottom or run out of this.
I’m going to push into the ground, extend my body again, to generate speed, and roll out. You want to get good at your pumping or the best places to learn actually are BMX tracks or pump tracks.
That’s what they’re specifically designed for. You can link up and turns jumps rollers of all sorts to really sort of link the motion together and get it really good plus it safe environment even better.
Bunny Hop
This next one is actually essential for the hardtail. It’s the bunny hop. It’s one of the most useful ones I think because actually it’s essentially picking the bike up and putting it down somewhere else, using your body.
Now, when you have got less bounce and all your mates out there on their big old full suspension this one can make your life so much easier when riding down these gnarly trails.
Where can you use a bunny hop then we’ll actually, there are tons of places that it’s both practical and useful skill to have from hopping over really rough sections to pick and different lines, to just clear and gaps and trail obstacles that might be in the way, how do we bunny hop?
Well, let’s start with body position. I’ve got a trustee tree I placed here earlier where I can show it. So what position are we going to be in?
We’re going to start with our pedals level up in the neutral riding position. So bum sort of over, or just slightly behind the saddle, a bend in the knees and in the arms here and just ready to sort of squat into the bike.
The first part is sort of the bunny hop motion is once you’re in that neutral riding position, you’re going to squat into the bike.
Then also shifting your weight slightly backward, kind of like a coiled snake, ready to strike. But we’ll get back to that bit in a minute.
You can practice this stuff either static, moving along, if you like, but going along in squat, into the bike, shifting your way ever so slightly back, ready to explode out of it.
It’s then all about shifting your weight backward. As I said, so it’s downshifted your weight and pull up with your arms so you’ll become down and when you shift your weight backward, you should notice that that will extend the arms as well.
Lift that front wheel so we’ve done the front end, but now he needs to get the back end to come up as well.
Once you’ve got that front-end sort of lifting kind of motion dialed in, you really need to get the back end up. That’s the bunny hop, obviously.
So, once you’re back here and your body weight is back here, it’s then leaping sort of diagonally up forwards in an to bring the back end up. So, what you’ll end up doing is something like a little cat leap like that.
This is done by forcing your feet back in the pedals to grip while shifting all your body weight, picking the front end up diagonally forward and forwards to level the bike out in the air.
As you’ve no doubt learned by now, line choice on a hardtail can be crucial to how your ride goes.
Avoiding bumps, jumping, bumps, whatever the smoothest route can actually pay dividends sometimes, especially for your ankles and wrists were thank you, Lily bumpy section today, and I’m going to run you through the line choices here and show you how I do each one.
So, you can have a little think about next time you’re on a ride.
What line might be best for you on your hotel line choice on this segment then? Well, we’ve got two main lines. You’ve got the left or right ss left outside line.
It’s smoother, but it’s longer or we then come to this, the straight line through it. It’s obviously got a bit of a drop it’s a lot steeper and is going to require a lot more commitment on your heart’s out.
The running’s about the same for both of them. So, it really depends on what you want to hit and where you are. The second part of our section then?
Well, again, there are two main lines. There’s this rider left again. So, it’s like I said, a bit Wavier, but it’s entirely, rollable all the way around the mainline.
That’s a whole lot more commitment. Once you get to the bottom, especially here on your RTL, you have got a drop that you’ve got to do.
There’s no way around it and you can’t even really roll this one, which is what makes line choice so important. I think it’s probably time we did them both and see how they go.
You have it and that’s both lines conquered on the hard tower. Now it’s clear to see that one is obviously slightly slower and longer than the other.
The other one is right behind me here, just requiring a little bit more thought and commitment on something. We know bounce on the backend, but still perfectly doable.
Conclusion
So next time, you will have a little think about what you’re going to ride and how to ride it on your trustee hard trail Street but anyway, that’s enough for today.
I hope I’ve managed to help you with some beginner skills for your new riders on hard trails out there. So for more information, you can visit OutdoorXsports and gets some cycling top skills.